Getting Started with Katib
This guide shows how to get started with Katib and run a few examples using the command line and the Katib user interface (UI) to perform hyperparameter tuning.
For an overview of the concepts around Katib and hyperparameter tuning, check the introduction to Katib.
Katib setup
Let’s set up and configure Katib on your Kubernetes cluster with Kubeflow.
Installing Katib
You can skip this step if you have already installed Kubeflow. Your Kubeflow deployment includes Katib.
To install Katib as part of Kubeflow, follow the Kubeflow installation guide.
If you want to install Katib separately from Kubeflow, or to get a later version of Katib, run the following commands to install Katib directly from its repository on GitHub and deploy Katib to your cluster:
git clone https://github.com/kubeflow/katib
make deploy
Note: You should have kustomize version >= 3.2 to install Katib.
Setting up persistent volumes
If you used the above-mentioned script to deploy Katib, you can skip this step. This script deploys PersistentVolumeClaim (PVC) and PersistentVolume (PV) on your cluster.
You can skip this step if you’re using Kubeflow on Google Kubernetes Engine (GKE) or if your Kubernetes cluster includes a StorageClass for dynamic volume provisioning. For more information, check the Kubernetes documentation on dynamic provisioning and PV.
If you’re using Katib outside GKE and your cluster doesn’t include a StorageClass for dynamic volume provisioning, you must create a PV to bind to the PVC required by Katib.
After deploying Katib to your cluster, run the following command to create the PV:
kubectl apply -f https://raw.githubusercontent.com/kubeflow/katib/master/manifests/v1beta1/components/mysql/pv.yaml
The above kubectl apply command uses a YAML file -
pv.yaml -
that defines the properties of the PV.
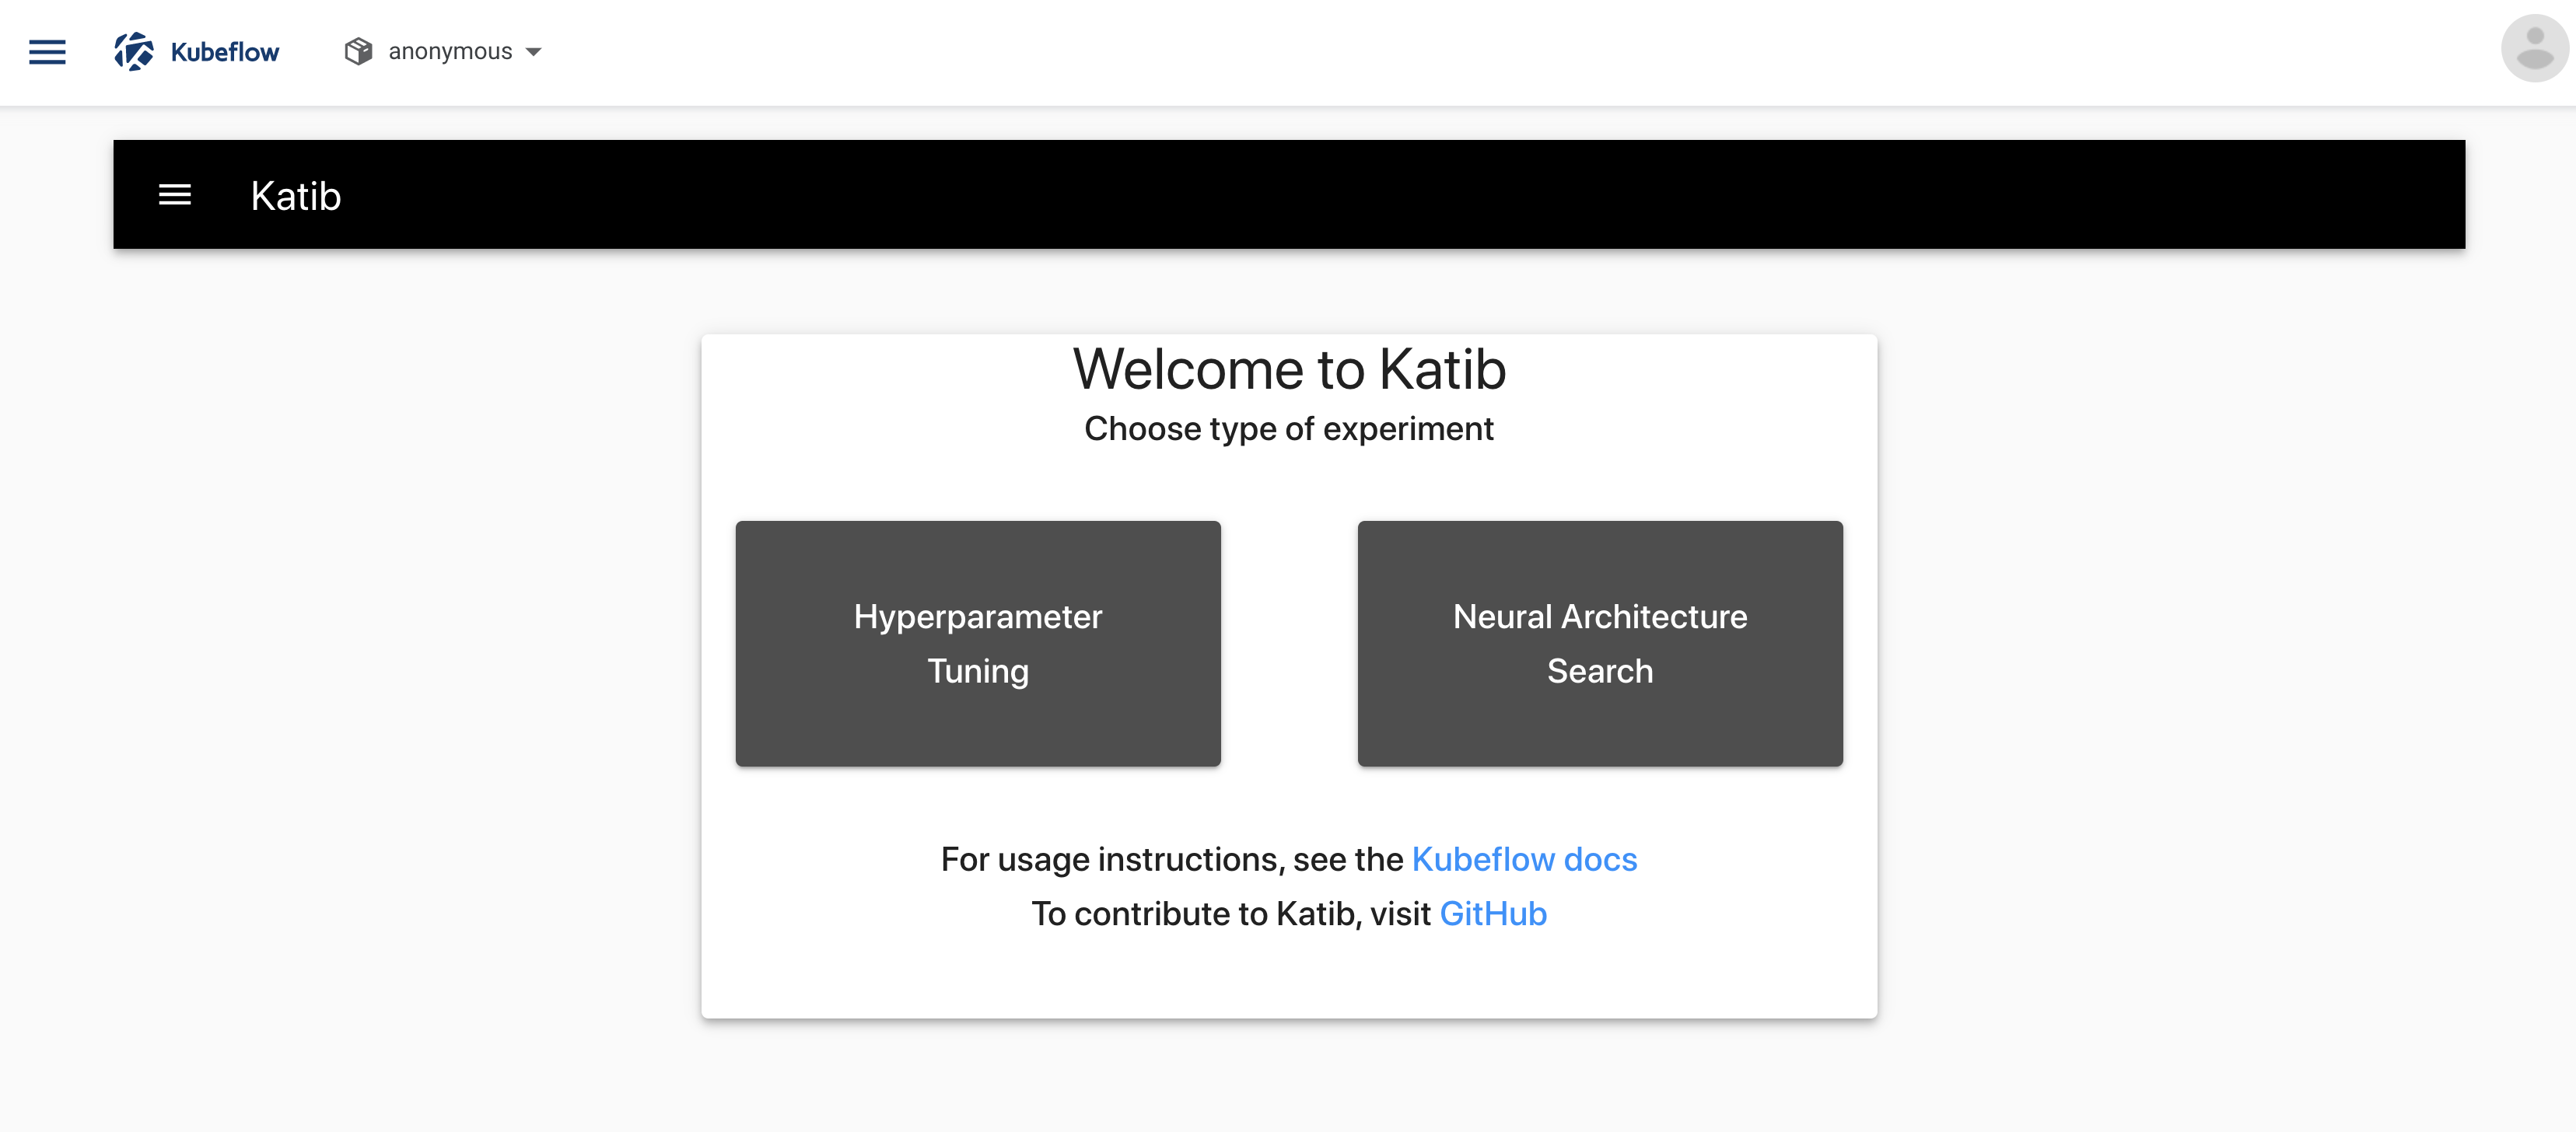
Accessing the Katib UI
You can use the Katib user interface (UI) to submit experiments and to monitor your results. The Katib home page within Kubeflow looks like this:
If you installed Katib as part of Kubeflow, you can access the Katib UI from the Kubeflow UI:
- Open the Kubeflow UI. Check the guide to accessing the central dashboard.
- Click Katib in the left-hand menu.
Alternatively, you can set port-forwarding for the Katib UI service:
kubectl port-forward svc/katib-ui -n kubeflow 8080:80
Then you can access the Katib UI at this URL:
http://localhost:8080/katib/
Check this guide if you want to contribute to Katib UI.
Examples
This section introduces some examples that you can run to try Katib.
Example using random algorithm
You can create an experiment for Katib by defining the experiment in a YAML configuration file. The YAML file defines the configurations for the experiment, including the hyperparameter feasible space, optimization parameter, optimization goal, suggestion algorithm, and so on.
This example uses the YAML file for the random algorithm example.
The random algorithm example uses an MXNet neural network to train an image classification model using the MNIST dataset. You can check training container source code here. The experiment runs twelve training jobs with various hyperparameters and saves the results.
If you installed Katib as part of Kubeflow, you can’t run experiments in the Kubeflow namespace. Run the following commands to change namespace and launch an experiment using the random algorithm example:
-
Download the example:
curl https://raw.githubusercontent.com/kubeflow/katib/master/examples/v1beta1/random-example.yaml --output random-example.yaml -
Edit
random-example.yamland change the following line to use your Kubeflow user profile namespace:Namespace: kubeflow -
(Optional) Note: Katib’s experiments don’t work with Istio sidecar injection. If you installed Kubeflow using Istio config, you have to disable sidecar injection. To do that, specify this annotation:
sidecar.istio.io/inject: "false"in your experiment’s trial template.For the provided random example with Kubernetes
Jobtrial template, annotation should be under.trialSpec.spec.template.metadata.annotations. For the KubeflowTFJobor other training operators check here how to set the annotation. -
Deploy the example:
kubectl apply -f random-example.yaml
This example embeds the hyperparameters as arguments. You can embed
hyperparameters in another way (for example, using environment variables)
by using the template defined in the trialTemplate.trialSpec section of
the YAML file. The template uses the
unstructured
format and substitutes parameters from the trialTemplate.trialParameters.
Follow the trial template guide
to know more about it.
This example randomly generates the following hyperparameters:
--lr: Learning rate. Type: double.--num-layers: Number of layers in the neural network. Type: integer.--optimizer: Optimization method to change the neural network attributes. Type: categorical.
Check the experiment status:
kubectl -n <YOUR_USER_PROFILE_NAMESPACE> get experiment random-example -o yaml
The output of the above command should look similar to this:
apiVersion: kubeflow.org/v1beta1
kind: Experiment
metadata:
  creationTimestamp: "2020-10-23T21:27:53Z"
  finalizers:
    - update-prometheus-metrics
  generation: 1
  name: random-example
  namespace: "<YOUR_USER_PROFILE_NAMESPACE>"
  resourceVersion: "147081981"
  selfLink: /apis/kubeflow.org/v1beta1/namespaces/<YOUR_USER_PROFILE_NAMESPACE>/experiments/random-example
  uid: fb3776e8-0f83-4783-88b6-80d06867ca0b
spec:
  algorithm:
    algorithmName: random
  maxFailedTrialCount: 3
  maxTrialCount: 12
  metricsCollectorSpec:
    collector:
      kind: StdOut
  objective:
    additionalMetricNames:
      - Train-accuracy
    goal: 0.99
    metricStrategies:
      - name: Validation-accuracy
        value: max
      - name: Train-accuracy
        value: max
    objectiveMetricName: Validation-accuracy
    type: maximize
  parallelTrialCount: 3
  parameters:
    - feasibleSpace:
        max: "0.03"
        min: "0.01"
      name: lr
      parameterType: double
    - feasibleSpace:
        max: "5"
        min: "2"
      name: num-layers
      parameterType: int
    - feasibleSpace:
        list:
          - sgd
          - adam
          - ftrl
      name: optimizer
      parameterType: categorical
  resumePolicy: LongRunning
  trialTemplate:
    failureCondition: status.conditions.#(type=="Failed")#|#(status=="True")#
    primaryContainerName: training-container
    successCondition: status.conditions.#(type=="Complete")#|#(status=="True")#
    trialParameters:
      - description: Learning rate for the training model
        name: learningRate
        reference: lr
      - description: Number of training model layers
        name: numberLayers
        reference: num-layers
      - description: Training model optimizer (sdg, adam or ftrl)
        name: optimizer
        reference: optimizer
    trialSpec:
      apiVersion: batch/v1
      kind: Job
      spec:
        template:
          metadata:
            annotations:
              sidecar.istio.io/inject: "false"
          spec:
            containers:
              - command:
                  - python3
                  - /opt/mxnet-mnist/mnist.py
                  - --batch-size=64
                  - --lr=${trialParameters.learningRate}
                  - --num-layers=${trialParameters.numberLayers}
                  - --optimizer=${trialParameters.optimizer}
                image: docker.io/kubeflowkatib/mxnet-mnist:v1beta1-e294a90
                name: training-container
            restartPolicy: Never
status:
  conditions:
    - lastTransitionTime: "2020-10-23T21:27:53Z"
      lastUpdateTime: "2020-10-23T21:27:53Z"
      message: Experiment is created
      reason: ExperimentCreated
      status: "True"
      type: Created
    - lastTransitionTime: "2020-10-23T21:28:13Z"
      lastUpdateTime: "2020-10-23T21:28:13Z"
      message: Experiment is running
      reason: ExperimentRunning
      status: "True"
      type: Running
  currentOptimalTrial:
    bestTrialName: random-example-smpc6ws2
    observation:
      metrics:
        - latest: "0.993170"
          max: "0.993170"
          min: "0.920293"
          name: Train-accuracy
        - latest: "0.978006"
          max: "0.978603"
          min: "0.959295"
          name: Validation-accuracy
    parameterAssignments:
      - name: lr
        value: "0.02889324678979306"
      - name: num-layers
        value: "5"
      - name: optimizer
        value: sgd
  runningTrialList:
    - random-example-26d5wzn2
    - random-example-98fpd29m
    - random-example-x2vjlzzv
  startTime: "2020-10-23T21:27:53Z"
  succeededTrialList:
    - random-example-n9c4j4cv
    - random-example-qfb68jpb
    - random-example-s96tq48v
    - random-example-smpc6ws2
  trials: 7
  trialsRunning: 3
  trialsSucceeded: 4
When the last value in status.conditions.type is Succeeded, the experiment
is complete. You can check information about the best trial in status.currentOptimalTrial.
-
.currentOptimalTrial.bestTrialNameis the trial name. -
.currentOptimalTrial.observation.metricsis themax,minandlatestrecorded values for objective and additional metrics. -
.currentOptimalTrial.parameterAssignmentsis the corresponding hyperparameter set.
In addition, status shows the experiment’s trials with their current status.
View the results of the experiment in the Katib UI:
-
Open the Katib UI as described above.
-
Click Hyperparameter Tuning on the Katib home page.
-
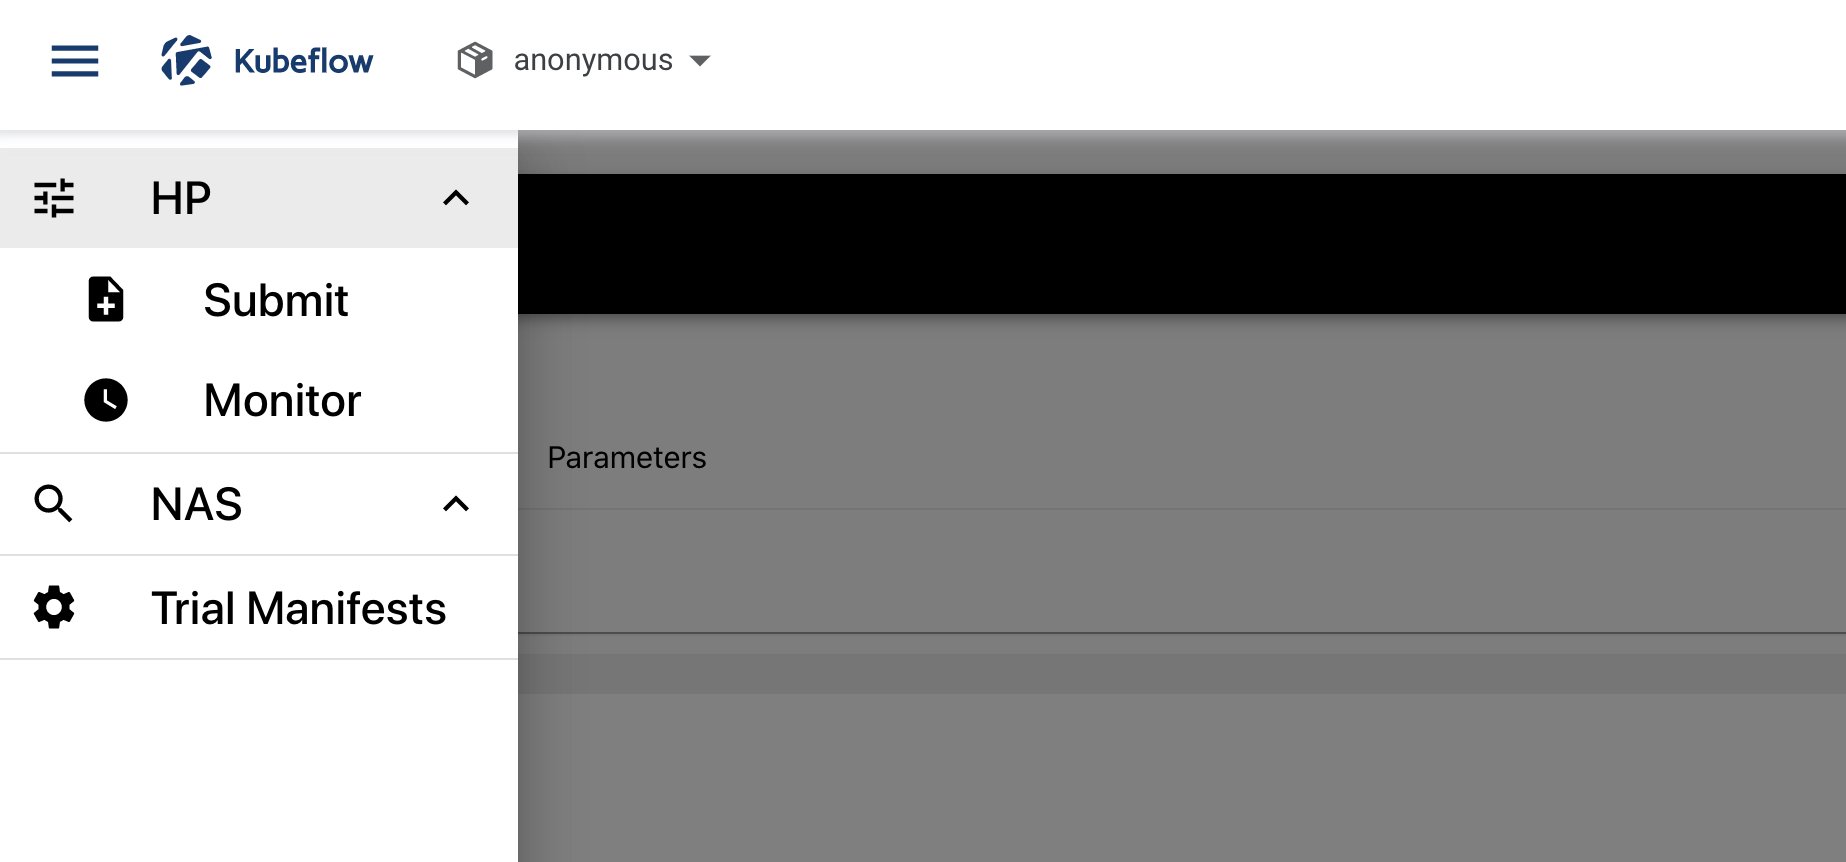
Open the Katib menu panel on the left, then open the HP section and click Monitor:
-
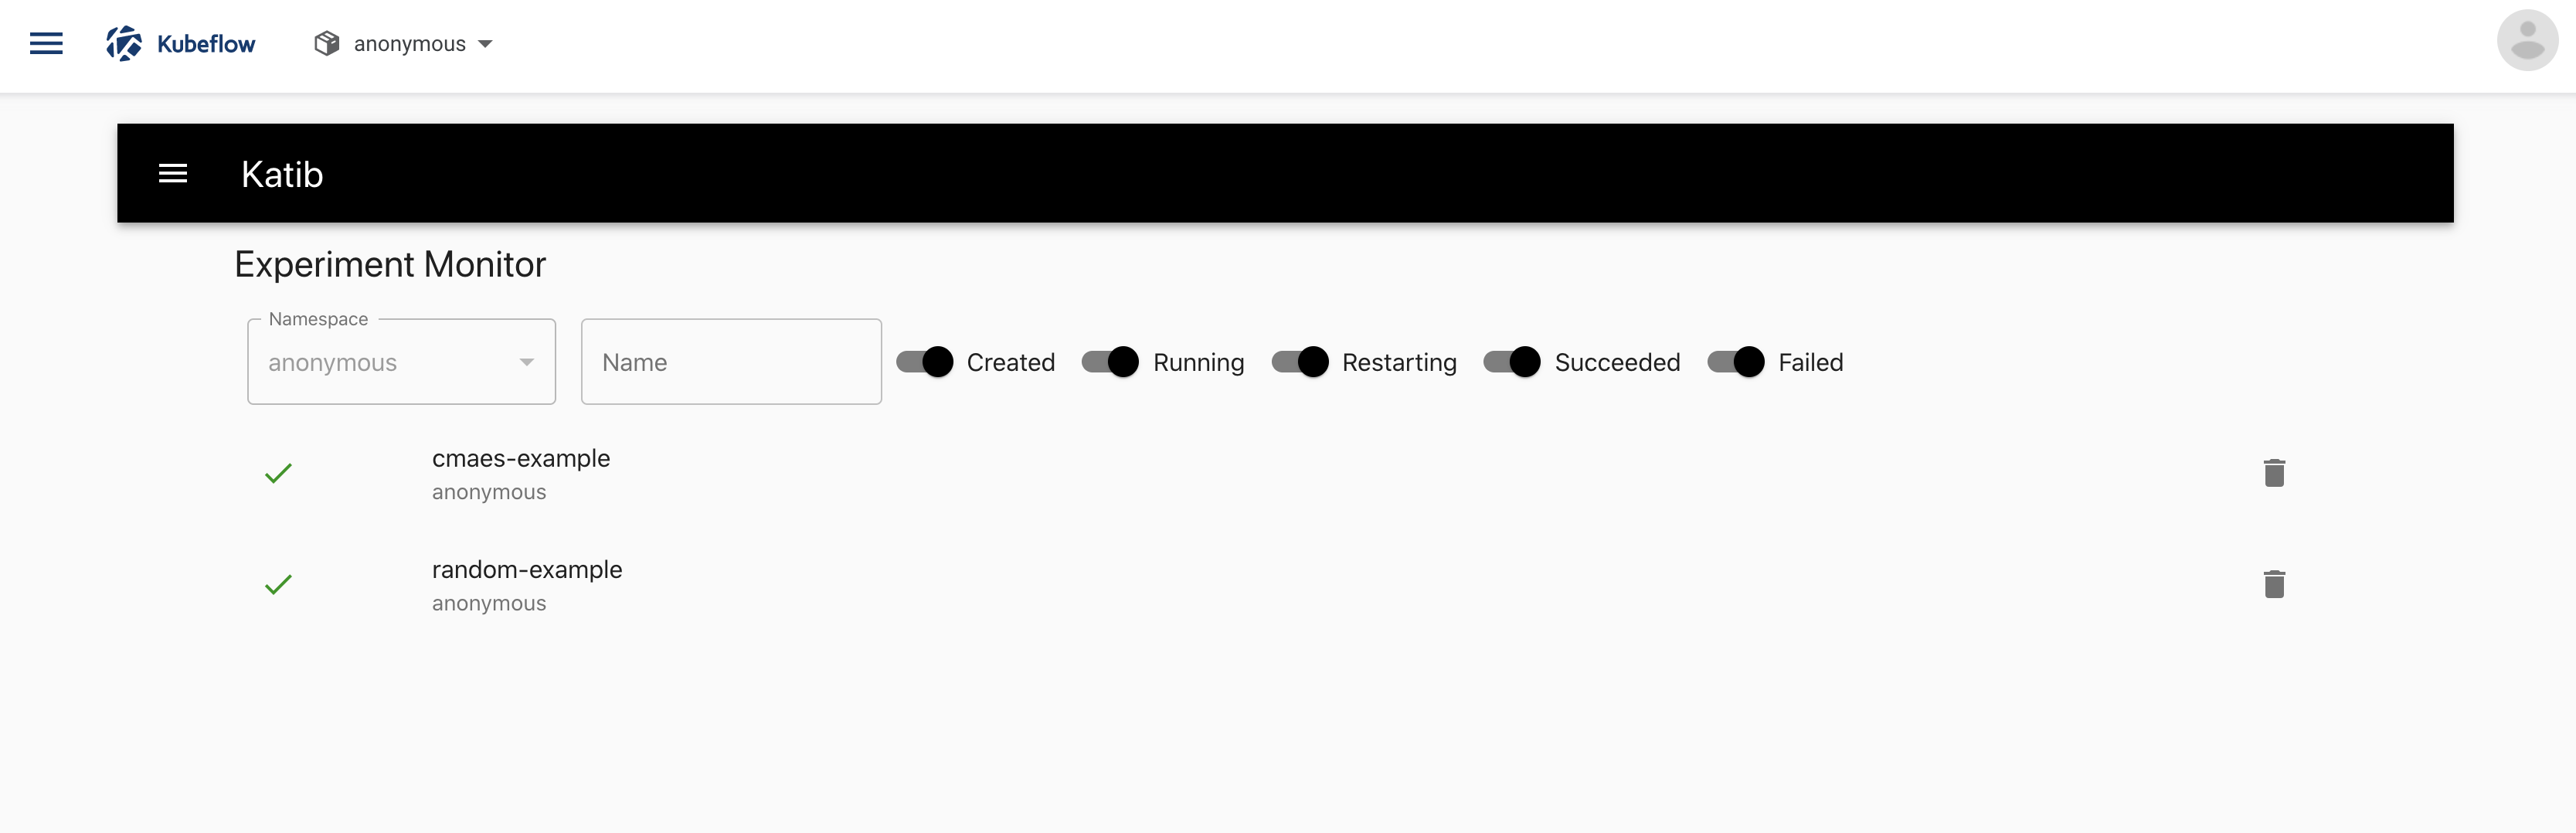
You should be able to view the list of experiments:
-
Click the name of the experiment, random-example.
-
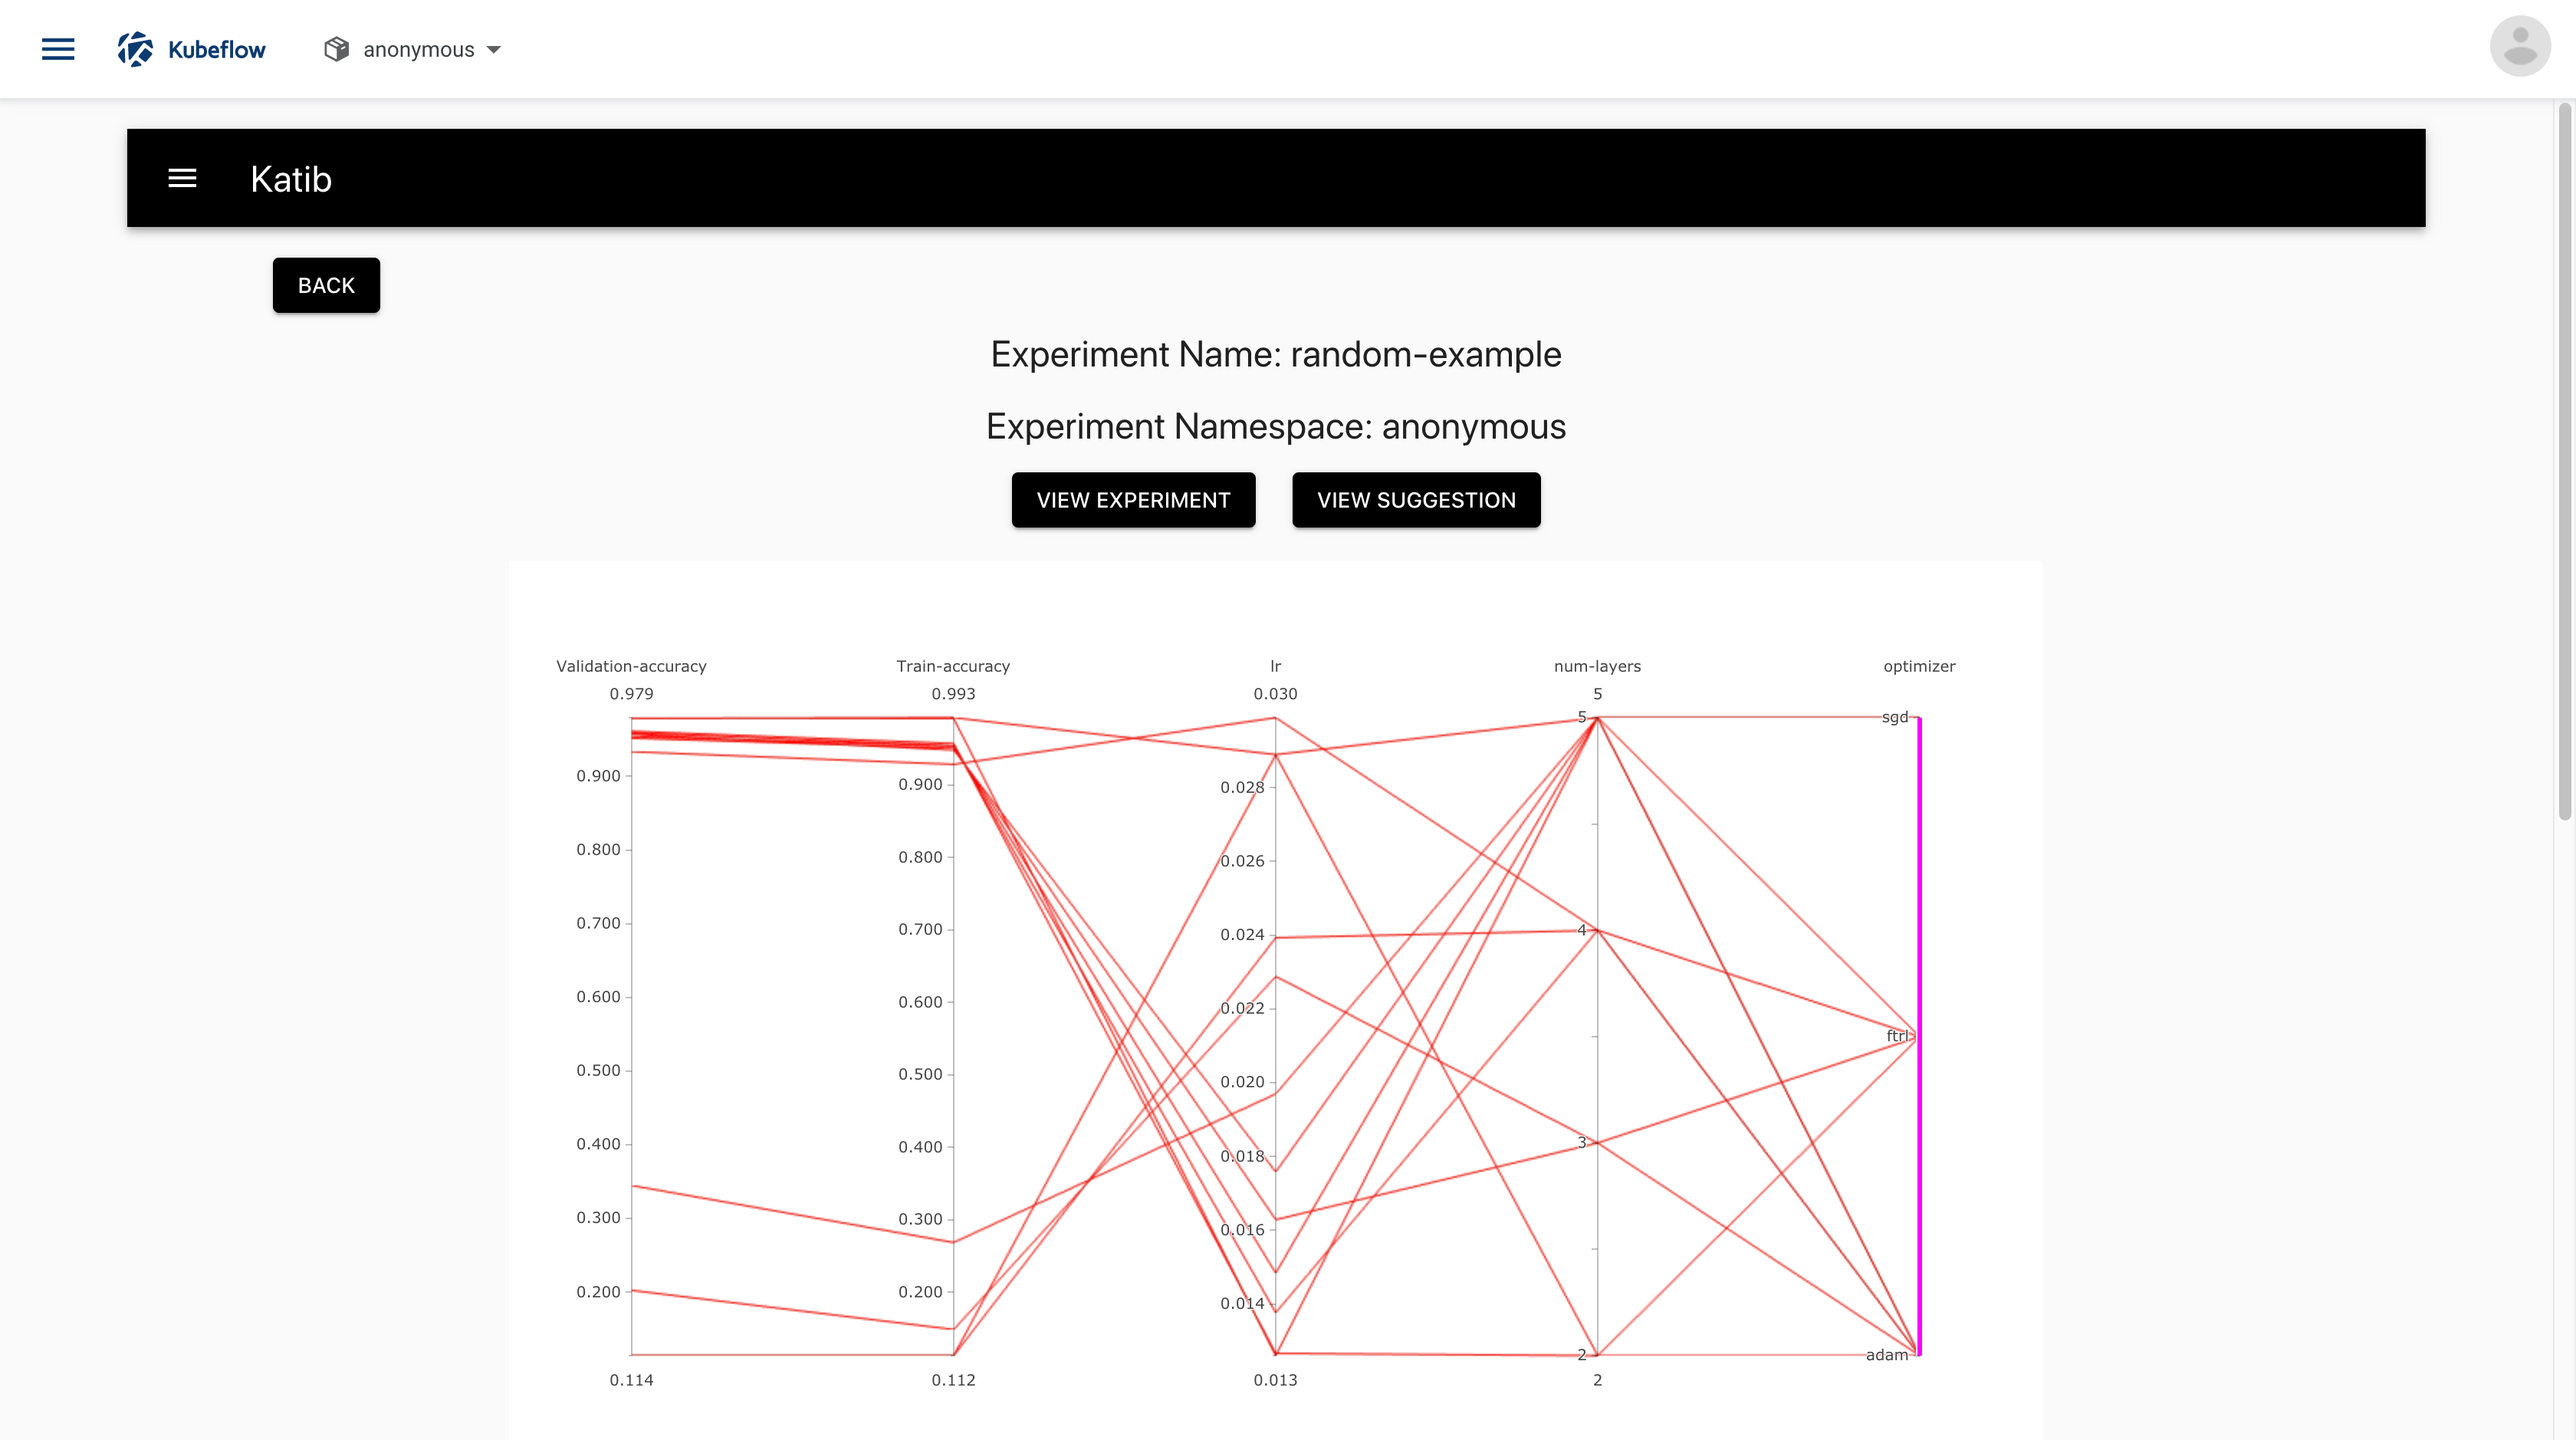
There should be a graph showing the level of validation and train accuracy for various combinations of the hyperparameter values (learning rate, number of layers, and optimizer):
-
Below the graph is a list of trials that ran within the experiment:
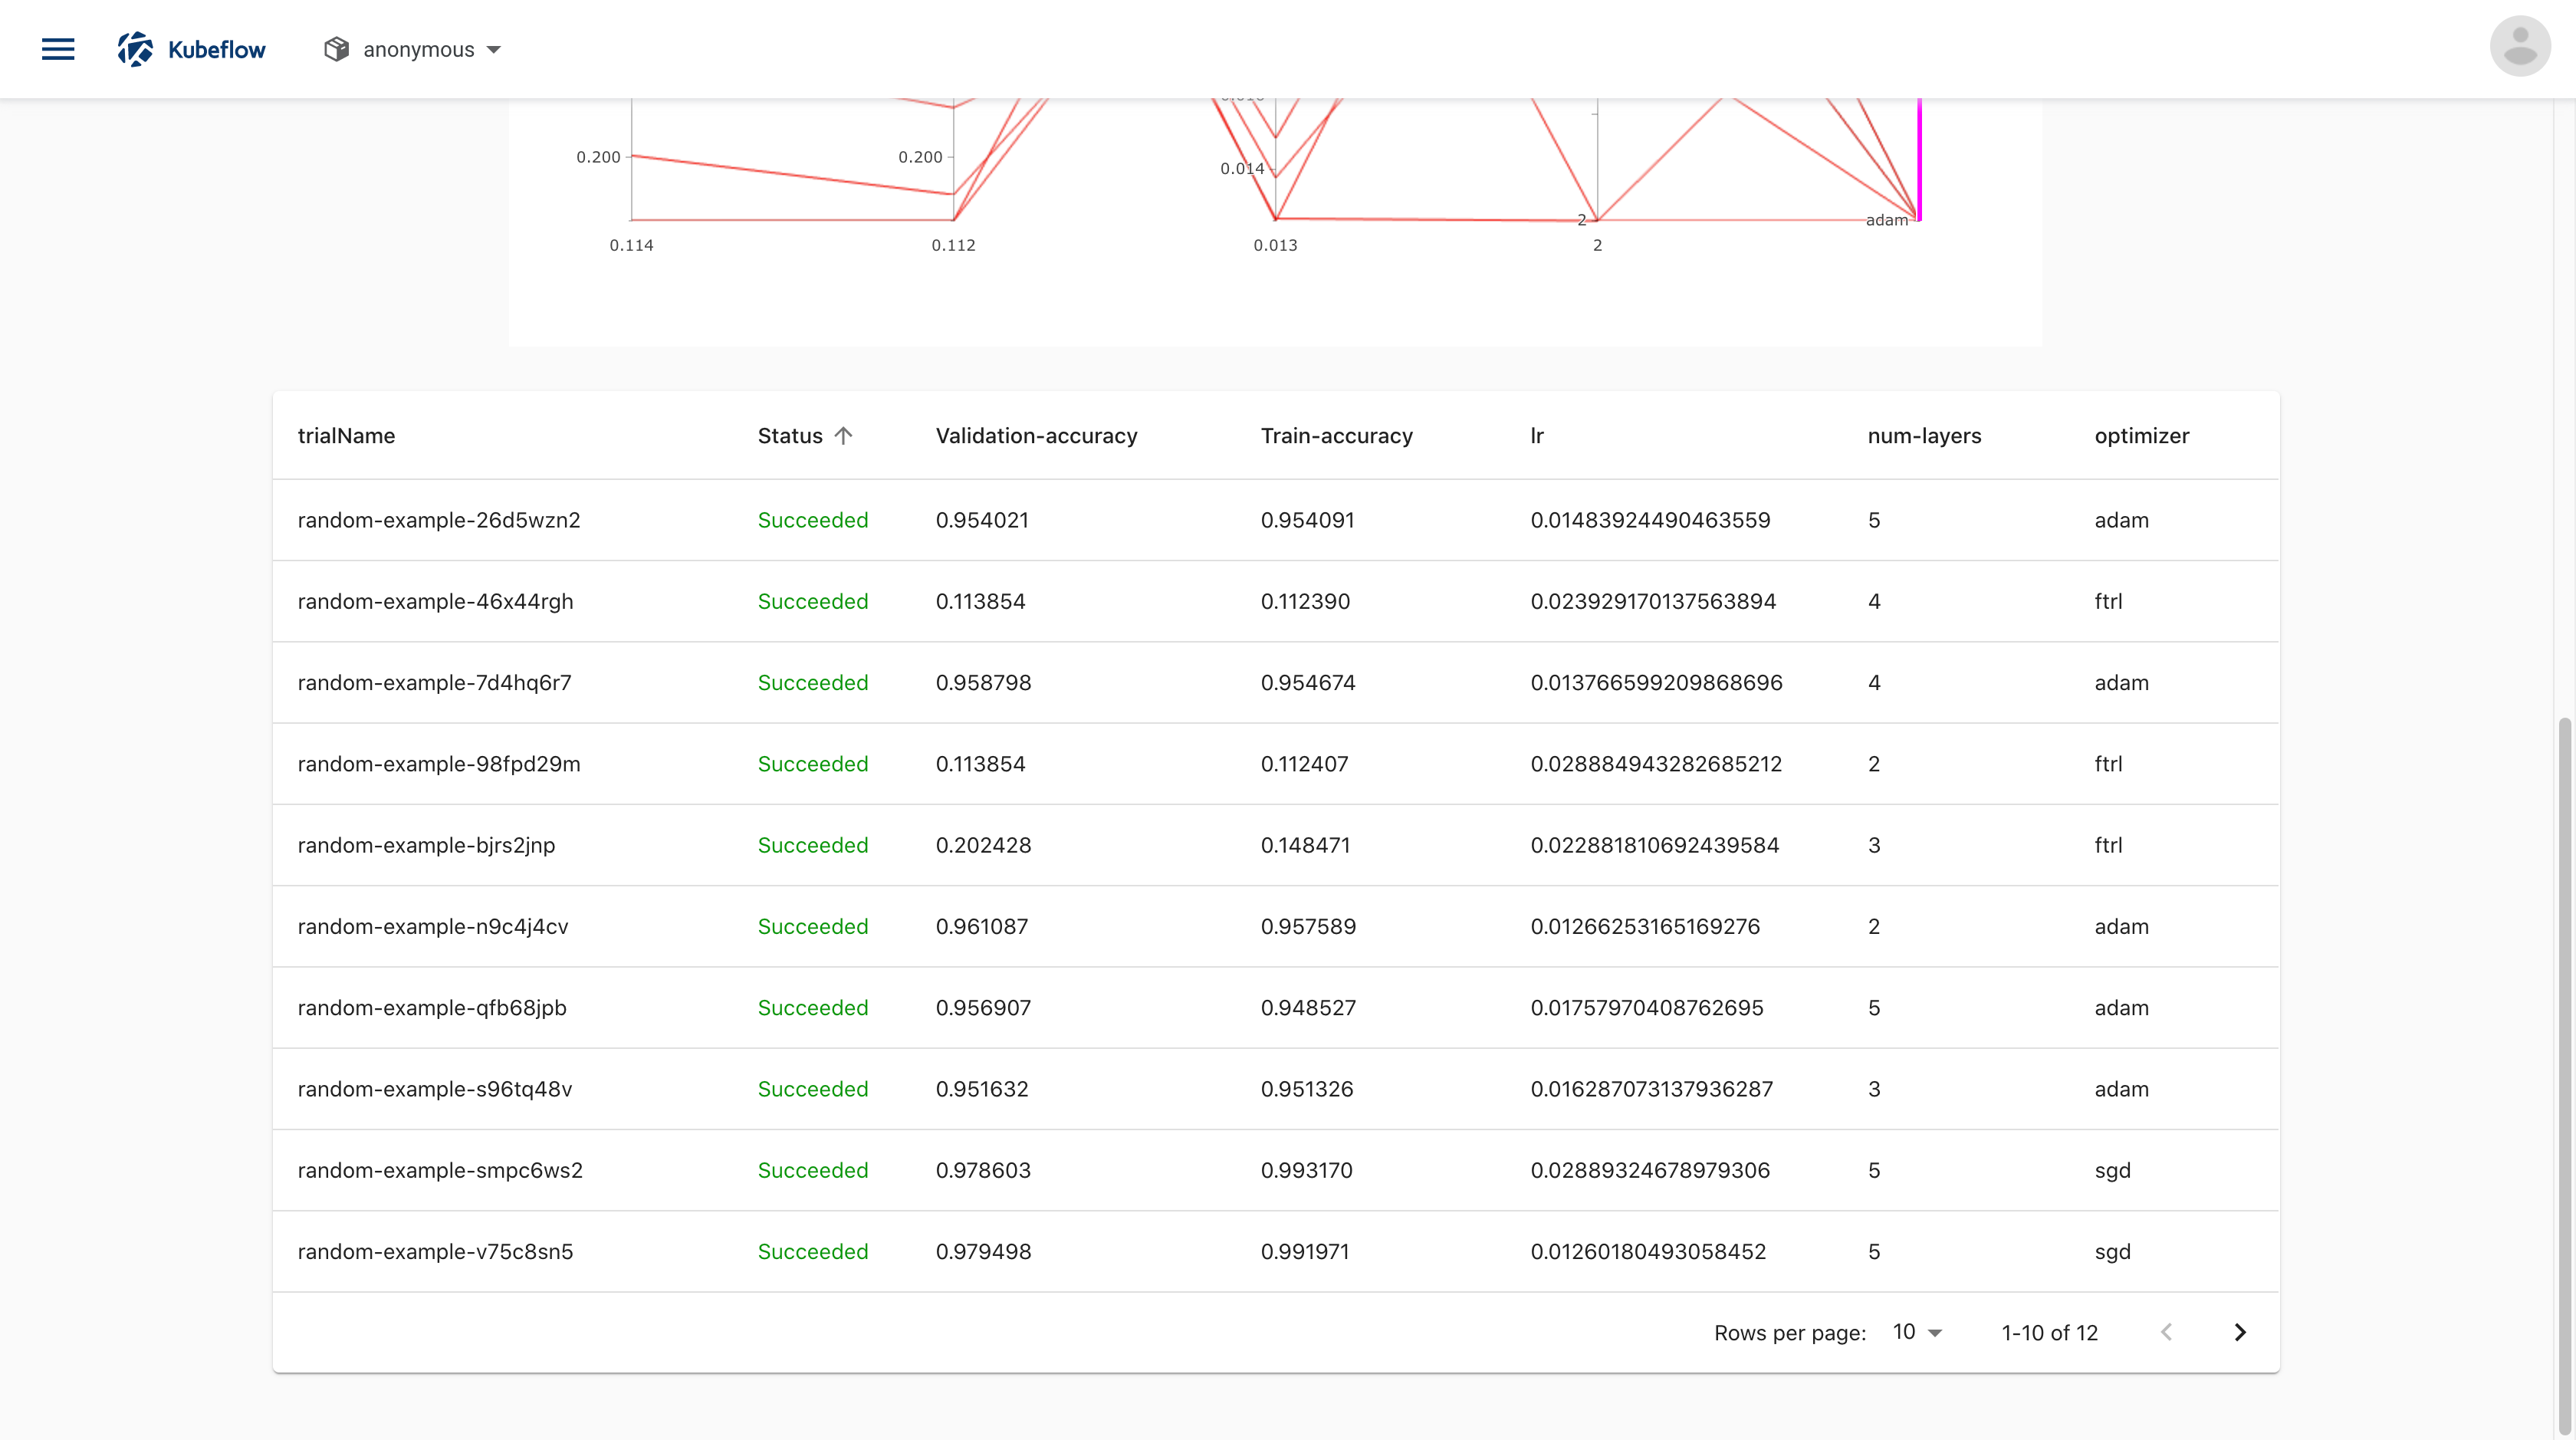
-
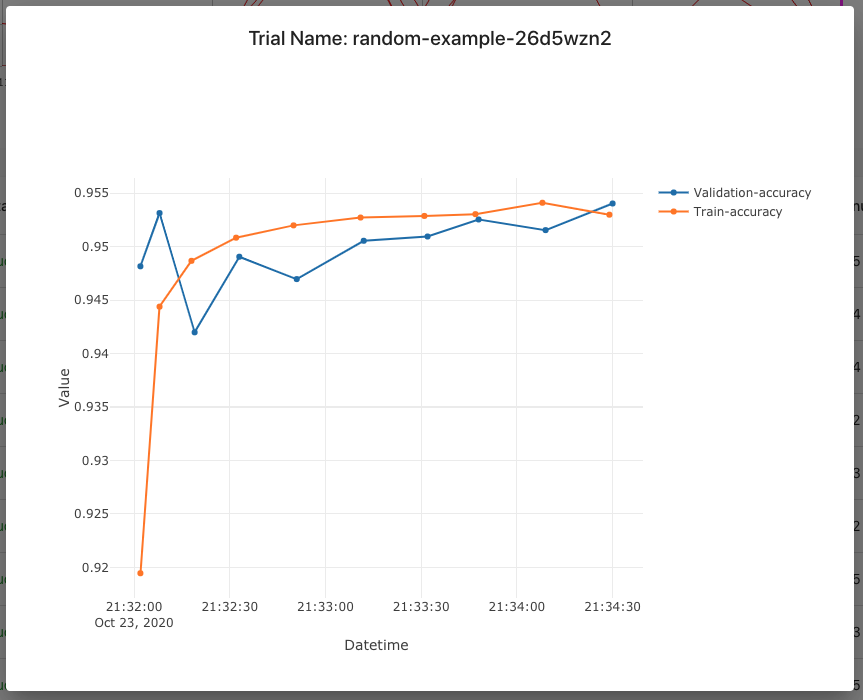
You can click on trial name to get metrics for the particular trial:
TensorFlow example
If you installed Katib as part of Kubeflow, you can’t run experiments in the Kubeflow namespace. Run the following commands to launch an experiment using the Kubeflow’s TensorFlow training job operator, TFJob:
-
Download
tfjob-example.yaml:curl https://raw.githubusercontent.com/kubeflow/katib/master/examples/v1beta1/tfjob-example.yaml --output tfjob-example.yaml -
Edit
tfjob-example.yamland change the following line to use your Kubeflow user profile namespace:Namespace: kubeflow -
(Optional) Note: Katib’s experiments don’t work with Istio sidecar injection. If you installed Kubeflow using Istio config, you have to disable sidecar injection. To do that, specify this annotation:
sidecar.istio.io/inject: "false"in your experiment’s trial template. For the providedTFJobexample check here how to set the annotation. -
Deploy the example:
kubectl apply -f tfjob-example.yaml -
You can check the status of the experiment:
kubectl -n <YOUR_USER_PROFILE_NAMESPACE> get experiment tfjob-example -o yaml
Follow the steps as described for the random algorithm example above to obtain the results of the experiment in the Katib UI.
PyTorch example
If you installed Katib as part of Kubeflow, you can’t run experiments in the Kubeflow namespace. Run the following commands to launch an experiment using Kubeflow’s PyTorch training job operator, PyTorchJob:
-
Download
pytorchjob-example.yaml:curl https://raw.githubusercontent.com/kubeflow/katib/master/examples/v1beta1/pytorchjob-example.yaml --output pytorchjob-example.yaml -
Edit
pytorchjob-example.yamland change the following line to use your Kubeflow user profile namespace:Namespace: kubeflow -
(Optional) Note: Katib’s experiments don’t work with Istio sidecar injection. If you installed Kubeflow using Istio config, you have to disable sidecar injection. To do that, specify this annotation:
sidecar.istio.io/inject: "false"in your experiment’s trial template. For the providedPyTorchJobexample setting the annotation should be similar toTFJob -
Deploy the example:
kubectl apply -f pytorchjob-example.yaml -
You can check the status of the experiment:
kubectl -n <YOUR_USER_PROFILE_NAMESPACE> describe experiment pytorchjob-example
Follow the steps as described for the random algorithm example above to get the results of the experiment in the Katib UI.
Cleaning up
To remove Katib from your Kubernetes cluster run:
make undeploy
Next steps
-
Learn how to configure and run your Katib experiments.
-
Learn to configure your trial templates.
-
Check the Katib Configuration (Katib config).
-
How to set up environment variables for each Katib component.
Feedback
Was this page helpful?
Glad to hear it! Please tell us how we can improve.
Sorry to hear that. Please tell us how we can improve.