Set Up Your Notebooks
Your Kubeflow deployment includes services for spawning and managing Jupyter notebooks.
You can set up multiple notebook servers per Kubeflow deployment. Each notebook server can include multiple notebooks. Each notebook server belongs to a single namespace, which corresponds to the project group or team for that server.
This guide shows you how to set up a notebook server for your Jupyter notebooks in Kubeflow.
Quick guide
Summary of steps:
-
Follow the Kubeflow getting-started guide to set up your Kubeflow deployment and open the Kubeflow UI.
-
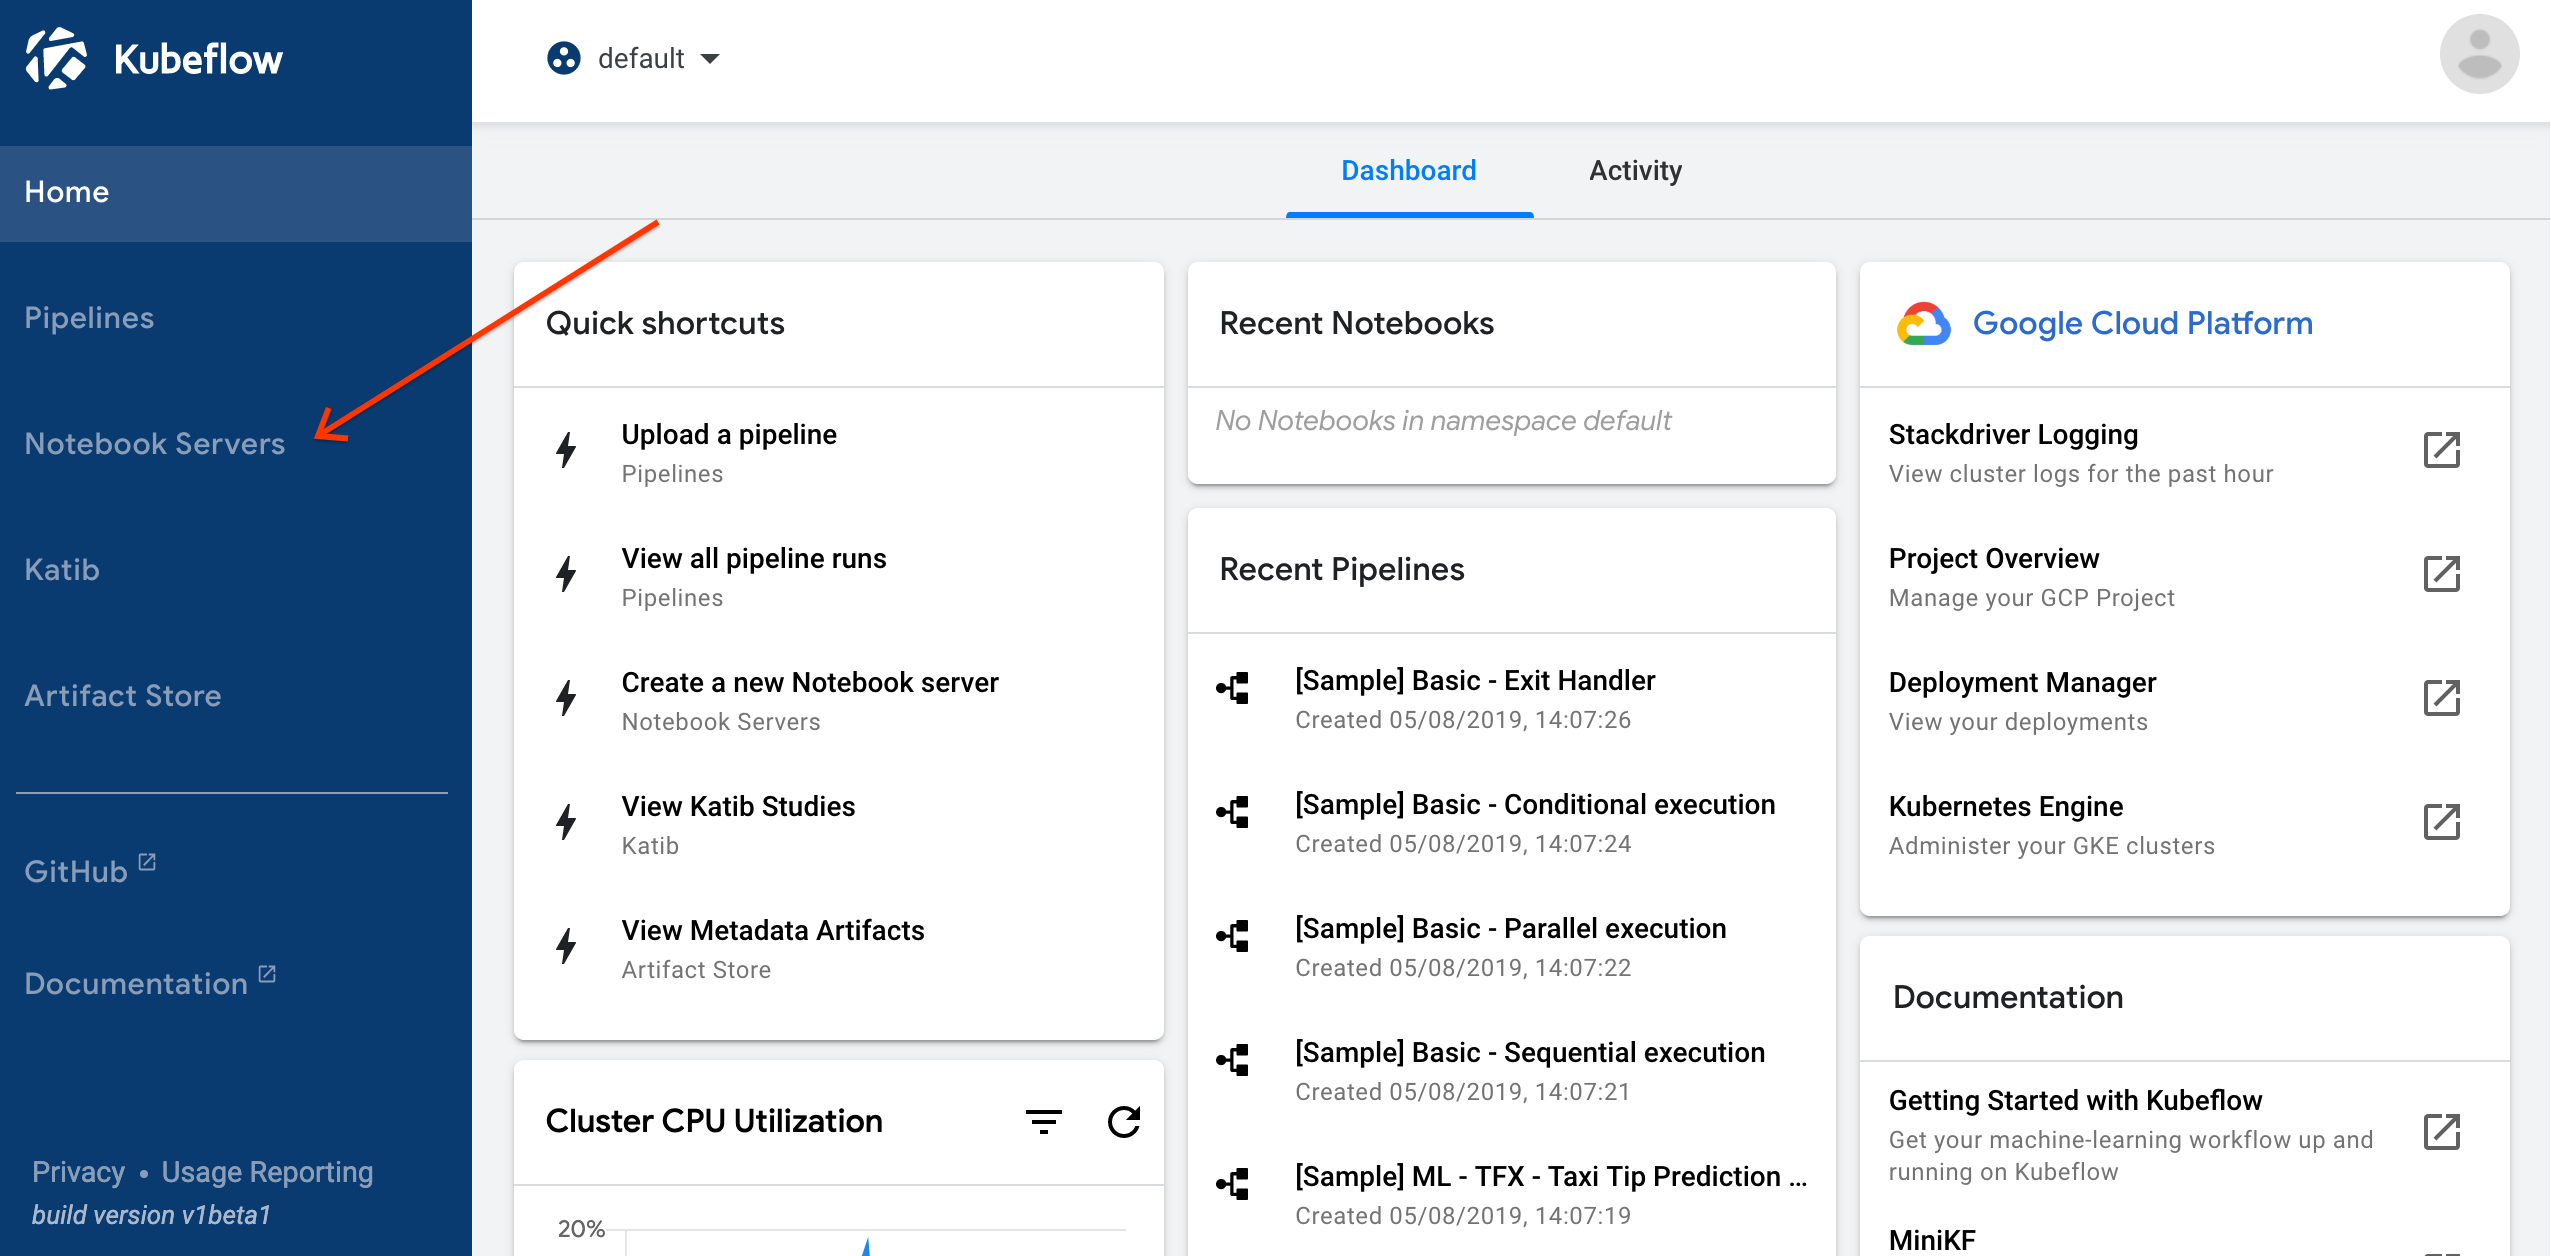
Click Notebook Servers in the left-hand panel of the Kubeflow UI.
-
Choose the namespace corresponding to your Kubeflow profile.
-
Click NEW SERVER to create a notebook server.
-
When the notebook server provisioning is complete, click CONNECT.
-
Click Upload to upload an existing notebook, or click New to create an empty notebook.
The rest of this page contains details of the above steps.
Install Kubeflow and open the Kubeflow UI
Follow the Kubeflow getting-started guide to set up your Kubeflow deployment in your environment of choice (locally, on premises, or in the cloud).
When Kubeflow is running, you can access the Kubeflow user interface (UI). If the getting-started guide for your chosen environment has instructions on accessing the UI, follow those instructions. Alternatively, see the generic guide to accessing the Kubeflow central dashboard.
Create a Jupyter notebook server and add a notebook
-
Click Notebook Servers in the left-hand panel of the Kubeflow UI to access the Jupyter notebook services deployed with Kubeflow:
-
Sign in:
- On GCP, sign in using your Google Account. (If you have already logged in to your Google Account you may not need to log in again.)
- On all other platforms, sign in using any username and password.
-
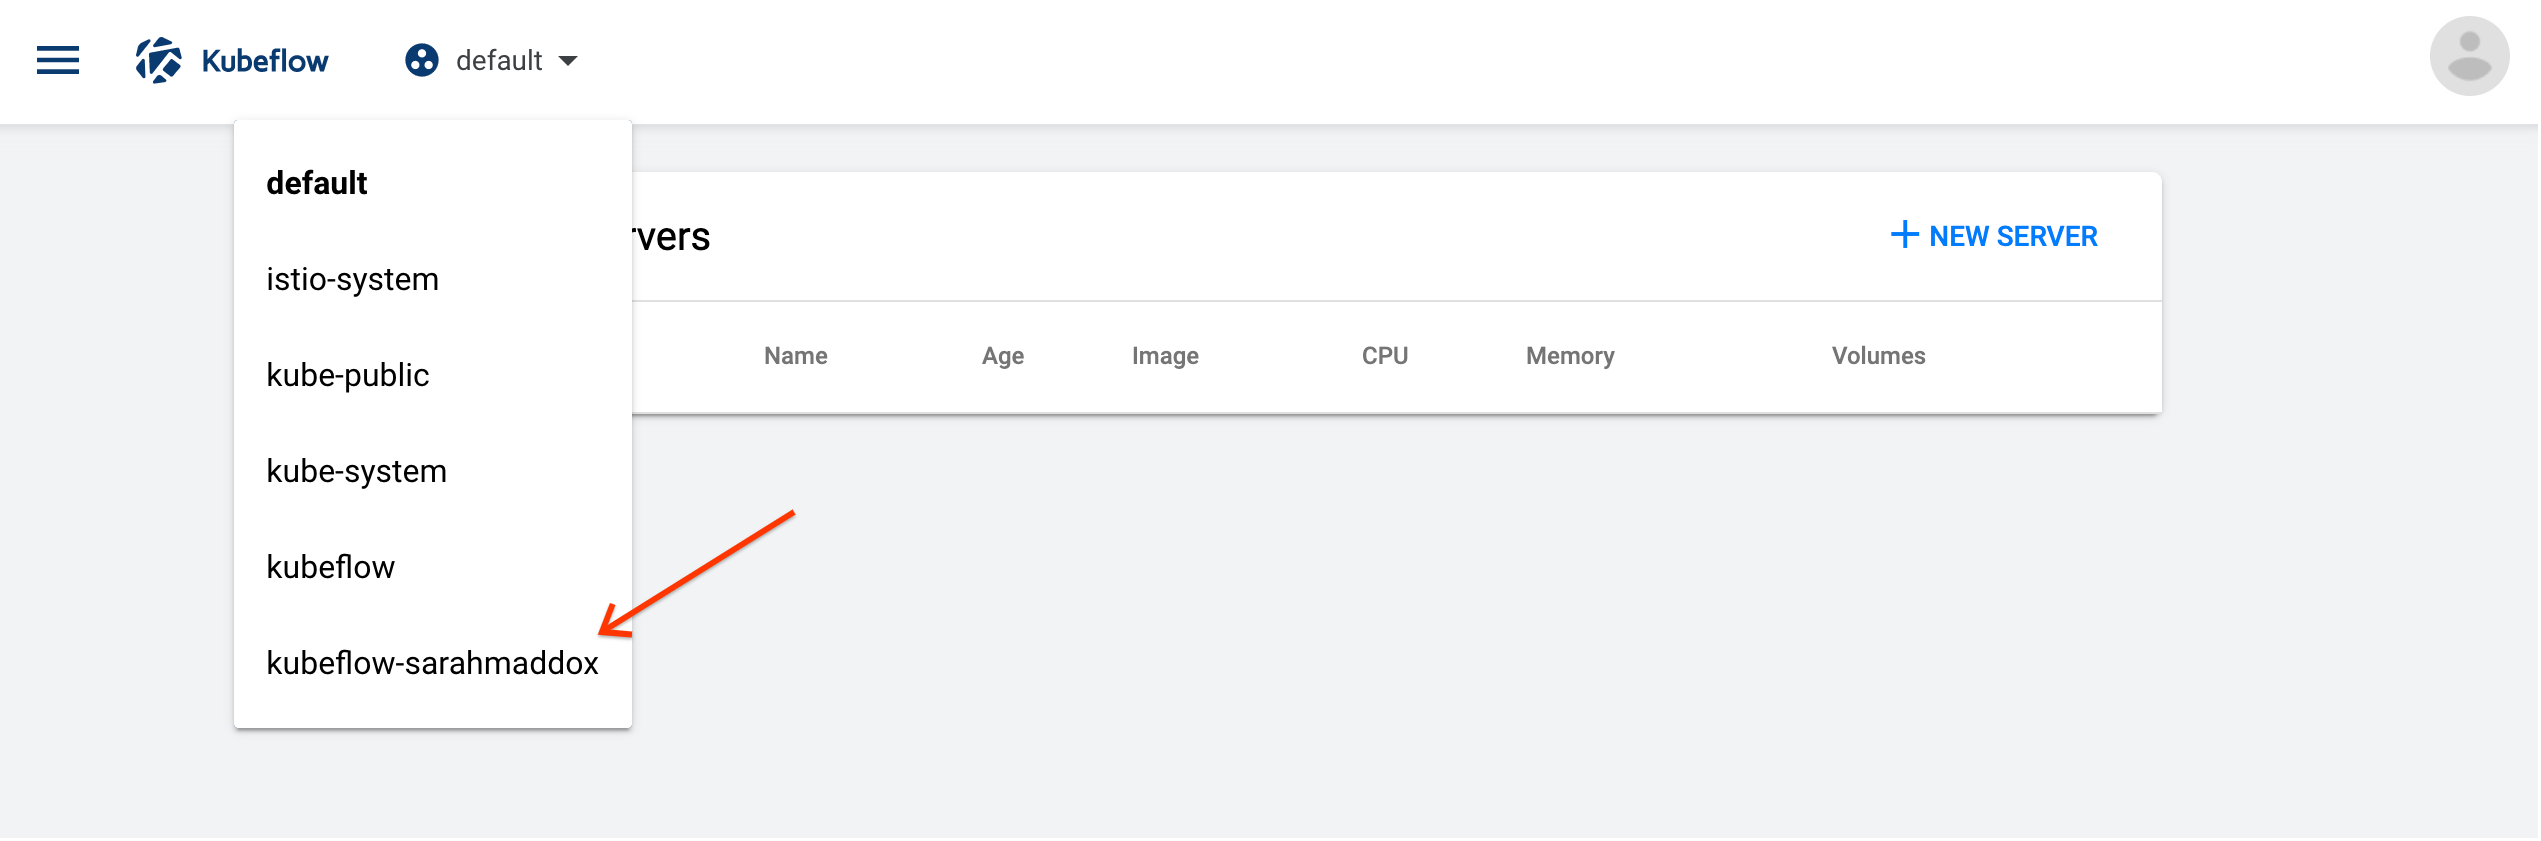
Select a namespace:
- Click the namespace dropdown to see the list of available namespaces.
- Choose the namespace that corresponds to your Kubeflow profile. (See the page on multi-user isolation for more information about namespaces.)
-
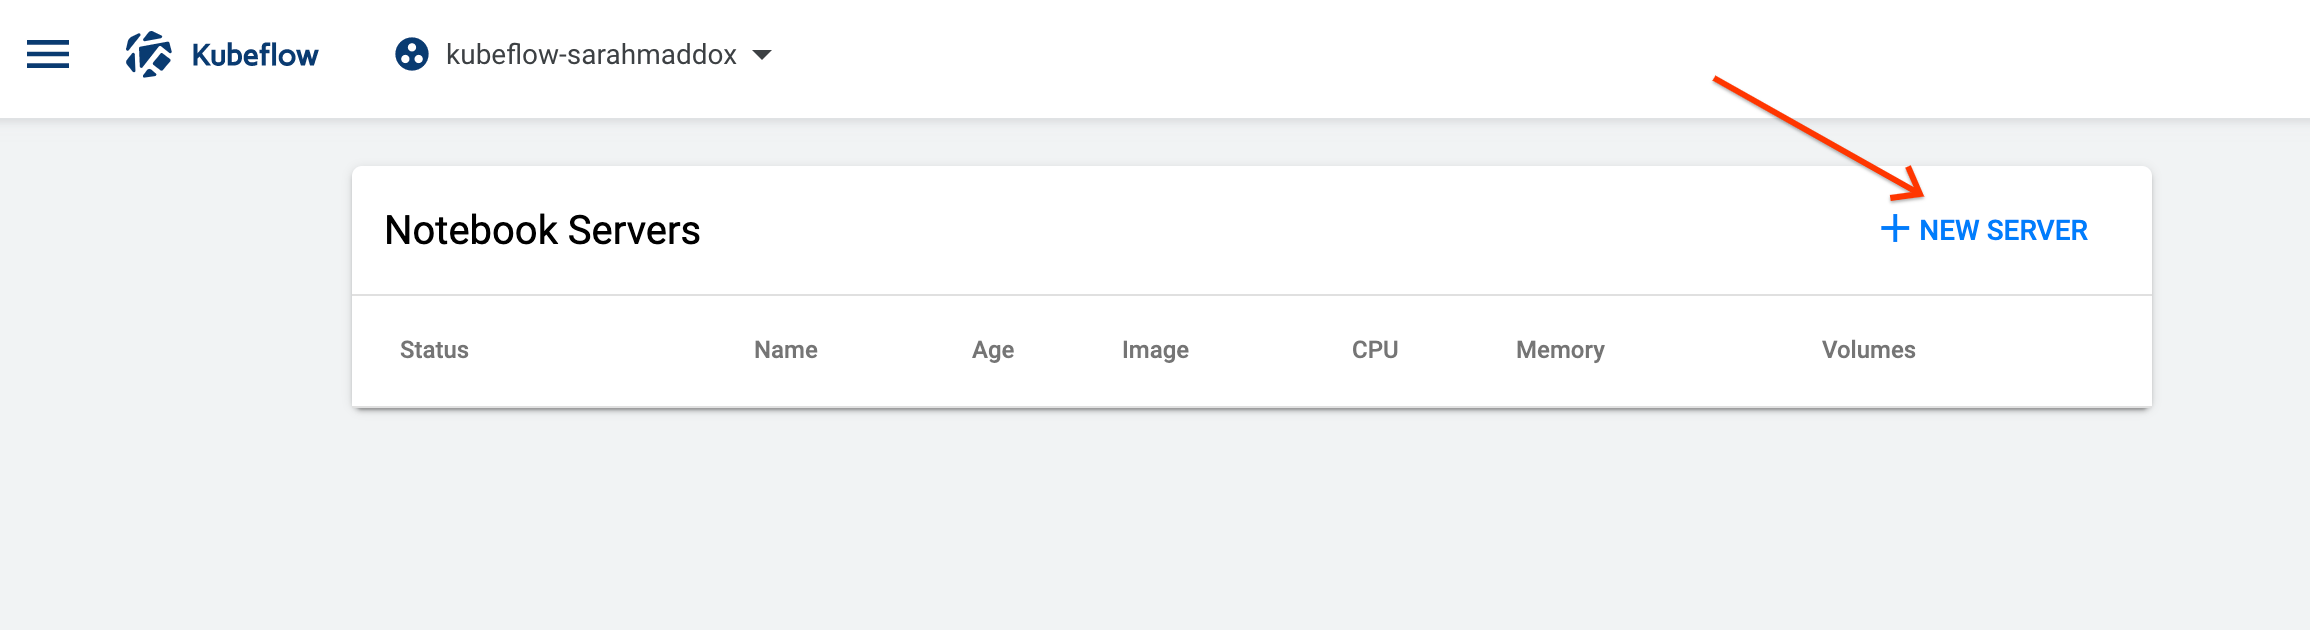
Click NEW SERVER on the Notebook Servers page:
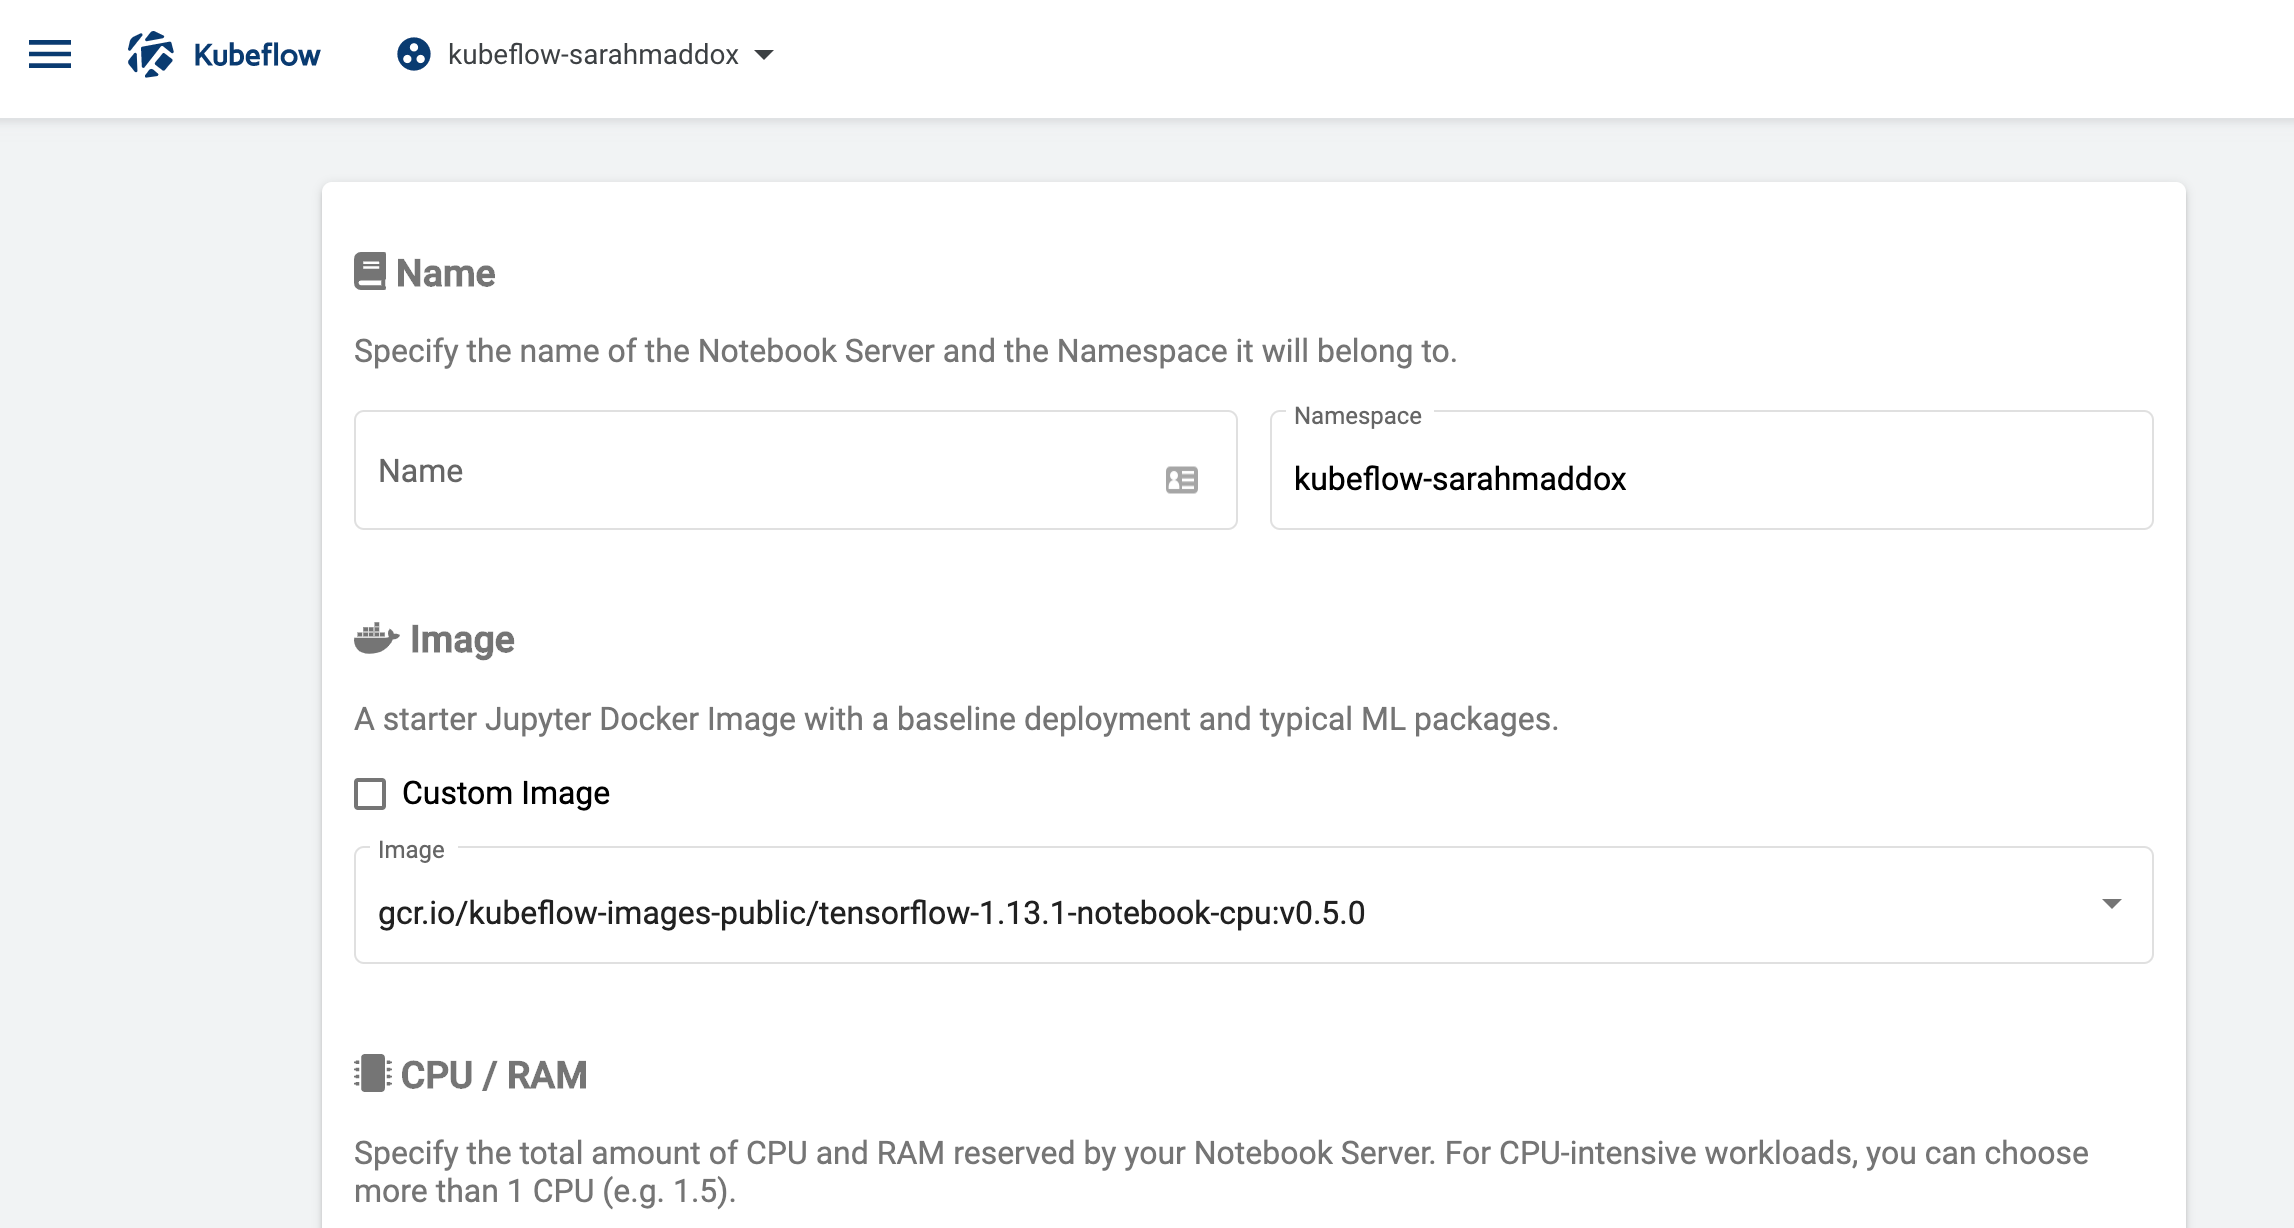
You should see a page for entering details of your new server. Here is a partial screenshot of the page:
-
Enter a name of your choice for the notebook server. The name can include letters and numbers, but no spaces. For example,
my-first-notebook. -
Kubeflow automatically updates the value in the namespace field to be the same as the namespace that you selected in a previous step. This ensures that the new notebook server is in a namespace that you can access.
-
Select a Docker image for the baseline deployment of your notebook server. You can specify a custom image or choose from a range of standard images:
-
Custom image: If you select the custom option, you must specify a Docker image in the form
registry/image:tag. For guidelines on creating a Docker image for your notebook, see the guide to creating a custom Jupyter image. -
Standard image: Click the Image dropdown menu to see the list of available images. The standard Docker images include typical machine learning (ML) packages that you can use within your Jupyter notebooks on this notebook server. Click one of the images to select it.
The image names indicate the following choices:
-
A TensorFlow version (for example,
tensorflow-1.15.2). -
cpuorgpu, depending on whether you want to train your model on a CPU or a GPU.- If you choose a GPU image, make sure that you have GPUs
available in your Kubeflow cluster. Run the following command to check
if there are any GPUs available:
kubectl get nodes "-o=custom-columns=NAME:.metadata.name,GPU:.status.allocatable.nvidia\.com/gpu" - If you have GPUs available, you can schedule your server on a GPU node by specifying a number of GPUs to be attached to the server under the GPUs section at the bottom of the form.
- If you choose a GPU image, make sure that you have GPUs
available in your Kubeflow cluster. Run the following command to check
if there are any GPUs available:
-
Kubeflow version (for example,
1.0.0).
Hint: If you’re not sure which image you need, choose a standard image running TensorFlow on a CPU. You need a TensorFlow image to run the example code in the experiment section below.
-
-
Specify the total amount of CPU that your notebook server should reserve. The default is
0.5. For CPU-intensive jobs, you can choose more than one CPU (for example,1.5). -
Specify the total amount of memory (RAM) that your notebook server should reserve. The default is
1.0Gi. -
Specify a workspace volume to hold your personal workspace for this notebook server. Kubeflow provisions a Kubernetes persistent volume (PV) for your workspace volume. The PV ensures that you can retain data even if you destroy your notebook server.
-
The default is to create a new volume for your workspace with the following configuration:
- Name: The volume name is synced with the name of the notebook server,
and has the form
workspace-<server-name>. When you start typing the notebook server name, the volume name appears. You can edit the volume name, but if you later edit the notebook server name, the volume name changes to match the notebook server name. - Size:
10Gi - Access mode:
ReadWriteOnce. This setting means that the volume can be mounted as read-write by a single node. See the Kubernetes documentation for more details about access modes. - Mount point:
/home/jovyan
- Name: The volume name is synced with the name of the notebook server,
and has the form
-
Alternatively, you can point the notebook server at an existing volume by specifying the name of the existing volume.
-
-
(Optional) Specify one or more data volumes if you want to store and access data from the notebooks on this notebook server. You can add new volumes or specify existing volumes. Kubeflow provisions a Kubernetes persistent volume (PV) for each of your data volumes.
-
(Optional) Specify one or more additional configurations as a list of PodDefault labels. To make use of this option, you must create a PodDefault manifest. In the PodDefault manifest, you can specify configurations including volumes, secrets, and environment variables. Kubeflow matches the labels in the configurations field against the properties specified in the PodDefault manifest. Kubeflow then injects these configurations into all the notebook Pods on this notebook server.
For example, enter the label
addgcpsecretin the configurations field to match to a PodDefault manifest containing the following configuration:matchLabels: addgcpsecret: "true"For indepth information on PodDefault usage, see the admission-webhook README.
-
(Optional) Schedule one or more GPUs for your notebook server, as discussed in the section on specifying your Docker image.
You can find more details about scheduling GPUs in the Kubernetes documentation.
-
(Optional) Change the setting for enable shared memory. The default is that shared memory is enabled. Some libraries like PyTorch use shared memory for multiprocessing. Currently there is no implementation in Kubernetes to activate shared memory. As a workaround, Kubeflow creates an empty directory at
/dev/shm. -
Click LAUNCH. You should see an entry for your new notebook server on the Notebook Servers page, with a spinning indicator in the Status column. It can take a few minutes to set up the notebook server.
-
You can check the status of your Pod by hovering your mouse cursor over the icon in the Status column next to the entry for your notebook server. For example, if the image is downloading then the status spinner has a tooltip that says
ContainerCreating.Alternatively, you can check the Pod status by entering the following command:
kubectl -n <NAMESPACE> describe pods jupyter-<USERNAME>Where
<NAMESPACE>is the namespace you specified earlier (defaultkubeflow) and<USERNAME>is the name you used to log in. A note for GCP users: If you have IAP turned on, the Pod has a different name. For example, if you signed in asUSER@DOMAIN.EXTthe Pod has a name of the following form:jupyter-accounts-2egoogle-2ecom-3USER-40DOMAIN-2eEXT
-
-
When the notebook server provisioning is complete, you should see an entry for your server on the Notebook Servers page, with a check mark in the Status column:
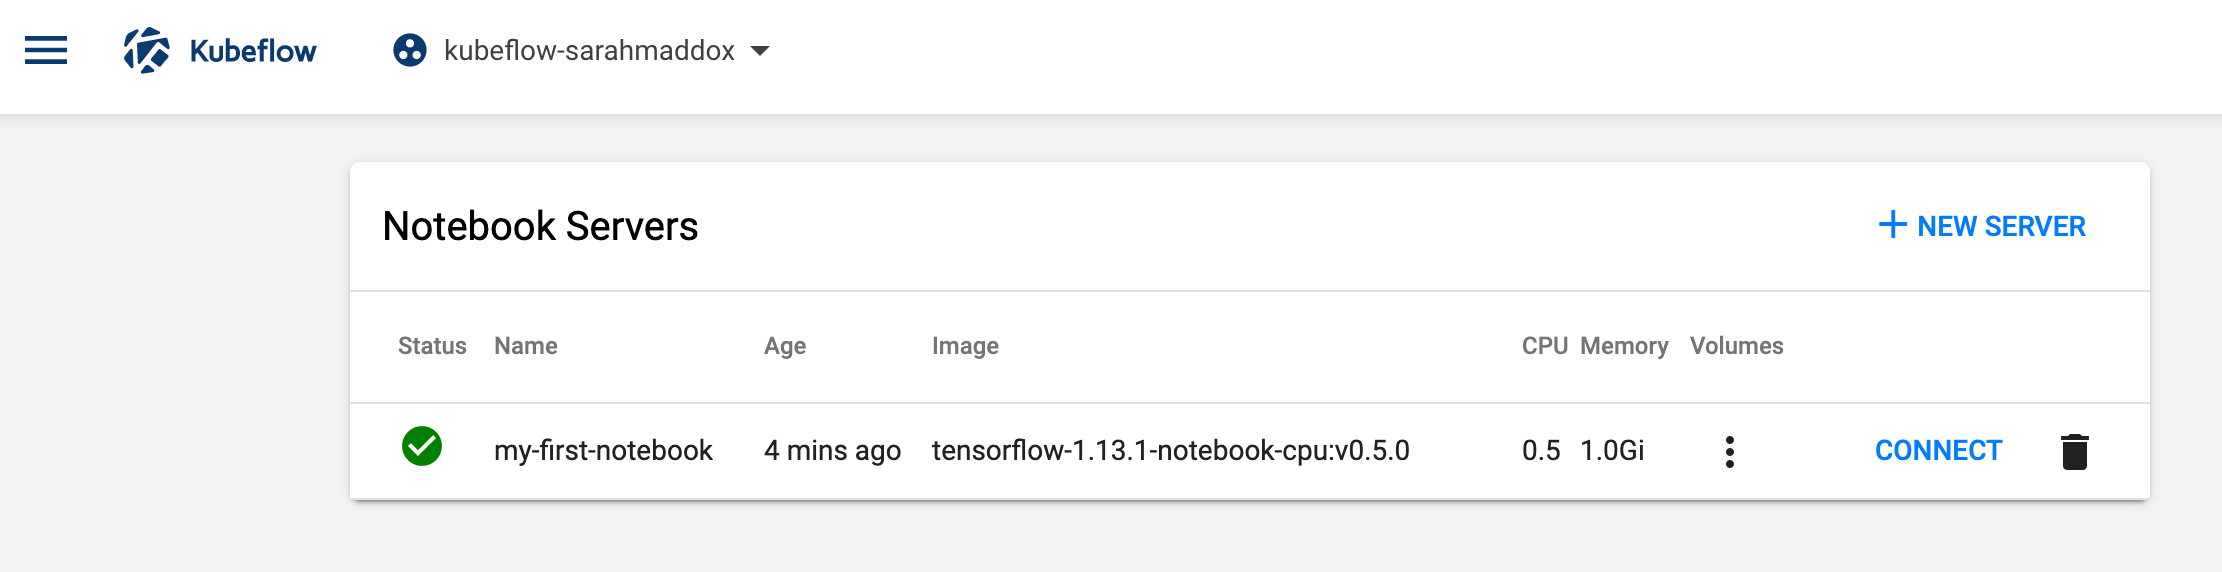
-
Click CONNECT to start the notebook server.
-
When the notebook server is running, you should see the Jupyter dashboard interface. If you requested a new workspace, the dashboard should be empty of notebooks:
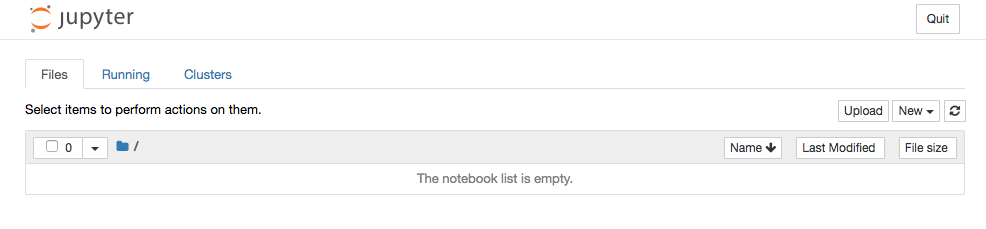
-
Click Upload to upload an existing notebook, or click New to create an empty notebook. You can read about using notebooks in the Jupyter documentation.
Experiment with your notebook
The standard notebook images include all the plugins that you need to train a TensorFlow model with Jupyter, including Tensorboard for rich visualizations and insights into your model.
To test your Jupyter installation, run the following basic ‘hello world’ program (adapted from mnist_softmax.py) as follows:
-
When adding the notebook server, make sure that the base image for your notebook server includes TensorFlow. To ensure this, you can select one of the standard images from the Image dropdown menu.
-
Use the Jupyter dashboard to create a new Python 3 notebook.
-
Copy the following code and paste it into a code block in your notebook:
from tensorflow.examples.tutorials.mnist import input_data mnist = input_data.read_data_sets("MNIST_data/", one_hot=True) import tensorflow as tf x = tf.placeholder(tf.float32, [None, 784]) W = tf.Variable(tf.zeros([784, 10])) b = tf.Variable(tf.zeros([10])) y = tf.nn.softmax(tf.matmul(x, W) + b) y_ = tf.placeholder(tf.float32, [None, 10]) cross_entropy = tf.reduce_mean(-tf.reduce_sum(y_ * tf.log(y), reduction_indices=[1])) train_step = tf.train.GradientDescentOptimizer(0.05).minimize(cross_entropy) sess = tf.InteractiveSession() tf.global_variables_initializer().run() for _ in range(1000): batch_xs, batch_ys = mnist.train.next_batch(100) sess.run(train_step, feed_dict={x: batch_xs, y_: batch_ys}) correct_prediction = tf.equal(tf.argmax(y,1), tf.argmax(y_,1)) accuracy = tf.reduce_mean(tf.cast(correct_prediction, tf.float32)) print("Accuracy: ", sess.run(accuracy, feed_dict={x: mnist.test.images, y_: mnist.test.labels})) -
Run the code. You should see a number of
WARNINGmessages from TensorFlow, followed by a line showing a training accuracy something like this:Accuracy: 0.9012
Please note that when running on most cloud providers, the public IP address is exposed to the internet and is an unsecured endpoint by default.
Next steps
- See a simple example of creating Kubeflow pipelines in a Jupyter notebook on GCP.
- Build machine-learning pipelines with the Kubeflow Pipelines SDK.
- Explore Kubeflow Fairing for a complete solution to building, training, and deploying an ML model from a notebook.
- See how to configure multi-user isolation in Kubeflow, to separate the notebooks for each user in a shared Kubeflow deployment.
- Learn the advanced features available from a Kubeflow notebook, such as submitting Kubernetes resources or building Docker images.
- Visit the troubleshooting guide for fixing common errors in creating Jupyter notebooks in Kubeflow
Feedback
Was this page helpful?
Glad to hear it! Please tell us how we can improve.
Sorry to hear that. Please tell us how we can improve.